We use cookies to offer you a better experience. For more information on how we use cookies you can read our Cookie and Privacy Policy.
How to Set Up a Router at Home
December 07, 2018
Despite what some people may tell you, you don’t need to hire a professional to set up a basic wireless router in your home. Most of the time, you can do the job yourself in mere minutes without an expert’s help.
Read on to learn the basic steps that will take you from powering on your device to securely using a web browser. This wireless router setup guide works for most major router brands on the market today and is recommended for home networks with standard security needs.
Manufacturer’s guided setup
Before you begin, decide where you want to place your router. It’s recommended that you pick a central location in the home for the permanent location. Given that you’ll be using several wireless devices in rooms throughout your home, this location will provide the best WiFi signal strength.
For the first steps of setup, pick a stable surface near your main computer or laptop to initiate installation. You can always move it after it’s been installed.
If you purchased your router new, everything you need to set it up should be in the box, including:
- The router itself (may include an antenna that may need to be screwed onto the main body)
- Power cord
- Ethernet cable
- Installation disc or startup guide (with instructions for online setup)
Be sure you have all the components before you start and make sure your computer is connected to the internet. You’ll also need to know where your internet service provider’s (ISP) modem is located because you’ll connect the router to it.
Insert the installation disc into your computer and follow the directions on the screen. If no disc is included or you don’t have a disc drive, you may be directed to visit a website with the directions listed to complete set up.
How to customize your router setup
Most computer users prefer a more customized approach to setup. For best results and a more secure connection, follow these general tips for connecting your router. These steps also work for setting up a router that is used, refurbished, or missing the installation disc or original manufacturer’s instructions.
1. Power on
Plug one end of the power cord into the back of your router and the other into a protected outlet. Using a GFCI protector or a power-strip is ideal and can safeguard your device. Then, wait for the router to power on completely.
Note: If you are installing a used router, be sure to reset it after powering up and before proceeding to the next step. You may need to do this by using the end of a paper clip to depress the “reset” pinhole, and then hold it until the lights start flashing on your router.
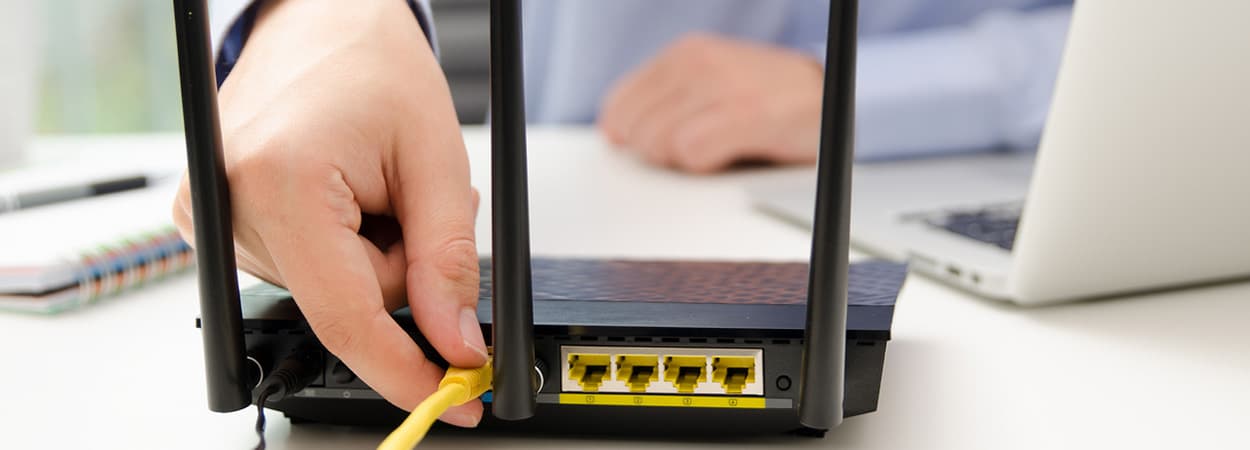
2. Connect the router to the modem
While some newer routers will use USB connections, some still use Ethernet cables. Whatever connection type your devices comes with, put one end into your internet service provider’s modem in the empty slot that’s sometimes labeled “to router,” and the other into your new router, usually labeled “internet” or “WAN.”
Unplug your ISP’s modem, wait one minute, and then plug it back in before moving to the next step.
3. Connect your computer
Run another Ethernet cable from any of the available slots on the new router into the Ethernet port on your computer or laptop. You may need to disable the WiFi on your computer for this step. This will prevent it from trying to connect to your new router via wireless before it is ready to do so.
For users whose laptops don’t have an Ethernet port, keep the computer’s WiFi turned on. Then, connect to the router with the default network settings provided in your manufacturer’s documentation and proceed to the next step.
4. Log in as an administrator
To access the dashboard of the new router, open a browser window on your connected computer or laptop:
- Type in the following IP address: http://192.168.1.1
- If that doesn’t work, try: http://192.168.0.1
- If your router documentation indicates a different address, although this isn’t common, use that.
You will be prompted to enter a username and password, which should be included in the user manual for your router. Passwords should eventually be changed for security reasons, but not until after a successful setup.
5. Provide your connection info
Next, enter information about your connection type. The exact location of where to enter this varies by router type. You can also access the router manufacturer’s website to browse their FAQs for details on a separate, data-connected mobile device for this info.
If you don’t know it, your internet service provider will be able to provide this information, including your static IP address, gateway address, etc.
This is also a good time to update your MAC address if your internet service provider uses one to authenticate your device. If you don’t have this saved from your old router - it’s usually printed on the bottom of the device - you will probably need to call your ISP to get it.
When you have it on hand, you can automatically authenticate your new router without needing to go through your ISP. This is especially useful if you are trying to install your new router after service hours.
The MAC address is usually on a specific tab in your router dashboard screen and can be updated there.
6. Verify the local and internet connections
Ensure that your computer can communicate with your router and that the router can access the internet by using the “test connection” button on your dashboard. This is located in different places for different brands. If it’s working, you’ll be able to open a new browser tab and visit your favorite website.
7. Go wireless
Now that your router is online and your computer can communicate via the Ethernet or USB connection, try using the WiFi by doing the following:
- Disconnect the cord going from the router to the computer.
- Turn the wireless adapter back on.
- Look for the SSID of the router.
If the router came with a password activated by default, you need to get that from the documentation and enter it. It’s sometimes referred to as a “network key.”
If your device can get online wirelessly, you’re good to go! Your other devices should now be able to access the internet via the router as well. This is a good time to put the router in the centralized location in your home where all devices can reach out wirelessly to receive info.
8. Set up additional security features
Do the following as soon as possible for extra protection on your home network:
- Change the SSID. Your home network can be named something other than the default SSID that came with your router. Change it to something that you will recognize but others won’t.
- Turn on WPA and WPA2 encryption.
- Enable firewalls and antivirus security software on all your connected devices.
- Change your router’s default user ID and password - just remember what you change it to.
What to do if problems occur
Setting up a new router can be intimidating, but in most cases, it’s something the average tech user can manage alone. If you do run into some issues, most router companies have many ways customers can reach them.
Be sure to check the documentation that came with your router to see all the options for getting help. From FAQs to toll-free phone numbers, the major companies usually provide a variety of customer service options for those who have purchased a new router that’s still within the original 30-day purchase window.
If you need help right away, see if there are live chat reps available. These usually have a shorter wait-time than phone reps, and many are available after hours. Just remember that you’ll need an internet connection of some kind to speak with them.
Also, don’t use the same computer you’re using to set up the router to initiate the chat. Opt for a phone with a data plan to get a chat rep online, and go from there to get your issues resolved and your WiFi router setup completed.
Related article: How to Boost Your WiFi Signal at Home
About the Author: Linsey Knerl is a contributing writer for HP® Tech Takes. Linsey is a Midwest-based author, public speaker, and member of the ASJA. She has a passion for helping consumers and small business owners do more with their resources via the latest tech solutions.
Recent Posts